Tuesday, March 6, 2012

Man Cave

What do you do when your husband tells you on Tuesday that he will be having 9 guys at your house for the weekend??
Well I immediately said absolutely not!
The last thing I wanted was 9 guys destroying my little house. Where were they all supposed to sleep, eat, and shower. I would say the maximum capacity of our house is 6 people and there is not really room to entertain. We have one guest bedroom with a little double bed and 1 shower...for 9!! Really, this just sounded like a recipe for disaster.
After I accepted the fact that I do share this house with my husband and I did have 4 friends over the previous weekend it was only fair that he be allowed 4 this weekend :) Unfortunately, it doesn't work that way. He couldn't just uninvite his friends. So it was time to get creative!

My mom came down to visit and we decided to make a "man cave" for the guys in the basement. At one point our basement was finished so there is paneling on the walls, there is a half bath and cement floor. Perfect! They could play their drinking games and go to the bathroom down there! As far as I was concerned they would never have a reason to come upstairs...
The biggest problem us that the basement was a complete disaster with junk everywhere! We have been trying to put new ceiling tiles in so we had all the old and scraps of new ones covering the floor. Plus all the other junk basements seem to accumulate. We also wanted to put a little carpet down there to make the space more inviting. So we got to work!
Of course I only thought to take a picture after we were halfway through cleaning...
Lots of vacuuming and dusting!Nasty floors!

Laying carpet with Hudson and Cooper helping of course
We had lots of obstacles to cut around: The pole in the center of the room, a small closet, and two small sticky outy parts of the wall. Turns out we are pretty good at laying carpet :)
Not too shabby right!?

We used Steve's hockey sticks for decoration :) Also, very thankful for all the folding chairs and lawn shairs we got as wedding gifts. Perfect furniture for the man cave!
This is the other half of the room where they were able to set up beer pong on a hunk of wood they found in the garage.
After doing all of this I told the boys my house better be clean when they left and I took off to Holland. I think it was better that way. They had all the fun they wanted without me hovering or being mad about the house. I was very pleased to come home on Sunday night to a perfectly clean house.
Thanks boys!

Tuesday, February 21, 2012

Pinterest Crafts

Meg and I had a ton of fun crafting a few weekends ago and I wanted to share a few more of our completed crafts.

First, toilet paper roll wall hanging. Who would have thought!? Cheapest wall decoration ever and it looks much more expensive (maybe not for every home, but it works for ours). Plus, if you get sick of it in a few months you don't have to feel guilty getting rid of it.
Step one: start saving toilet paper rolls and paper towel rolls
Two: flatten the rolls the long way. Make sure to get a good solid crease on both sides.
Three: Cut them into roughly 1.5" sections. This does not need to be perfect. In fact I think a little bit of variation looks better
Four: Play around with the design you want. You can do a specific pattern or create something different
Five: Hot glue!
Six: Spray paint it
Here is my finished product on the wall...
Not too shabby right?!

Next was Meg's project:: Red Neck Wine Glasses
This project took some searching to complete...
What you need: mason jars, glass candle sticks and glass glue
Step one: Find the darn candle sticks! We went to 5 different dollar stores in search of them. Dollar tree is where they are at...I think  (the one with the green sign)
Two: Glue the candle sticks to the mason jars
Three: let them dry and they are done!
Fun and cute for a backyard bbq. :) Some stores sell these for over 10 bucks each. The cost less then 2 bucks to make...so get crafting people!!

Monday, February 13, 2012

Homemade Dog Bed...

I have been wanting to buy Hudson a dog bed for some time now. Our whole house is wood floor and I feel bad that he has to sleep on the hard ground. I always look at dog beds no matter where I go: meijer, target, TJ Maxx, Petco...but they are all 40+ bucks and feel like they have 10 cotton balls stuffed into a huge sack. Not very comfy and not something that would hold up for a significant amount of time.
So, this Pinterest crafting weekend I decided to make one for my little baby :)

I found two different DIY ideas online and combined the ideas to make what I thought was the perfect dog bed without using a sewing machine!
I started with hitting the thrift store looking for an old fluffy comforter for the insides of the bed.

I found 2 of these lovely superman twin size comforters at Goodwill for 50% off! They were 2.50 each :) I then used a big needled and upholstery thread to sew the corners together. I wanted to make sure that once inside the cover it would still stay in the shape of a bed.
Hudson was excited from the beginning and insisted on laying on it while I was sewing haha
Next, we laid out the fleece and measured it against the size of the bed. 1.25 yards was the perfect amount!
So we started cutting strips into the sides about 1.5" thick by 3.5" long.
Once all the strips were cut we started tying in double knots. We left one side open so we could put the bed in at the end. One the final side, we only tied in single knots so that if I need to wash it eventually it would be easy to take apart.
Hudson LOVES the finished product!
Look how relaxed he looks :)

Along with the dog bed post I will include a quick recipe for dog treats with ingredients you most likely have in the house...
What you need:
-2 Cups whole wheat flour
-1 Cup Oats
-1/3 Cup Peanut Butter
-1 and 1/4 Cup hot water
-1 egg

Mix the flour and oats in one bowl, the peanut butter and hot water in another. Then combine. Roll out dough into 1/2" thick slab and cut out shapes with cookie cutter. (I used a soup can because we didn't have any cookie cutters)
Once cut out and placed on a cookie sheet. Brush with beaten egg. This gives the treats a shiny complete look :)
Bake at 350 degrees for 40 minutes and WaLa!
Delicious, crunchy, cheap dog treats :)

Sunday, January 22, 2012

Updating the upstairs

We finally got rid of our old, ugly bathroom sink. Every time I washed my hands I felt like I was in a middle school bathroom...you will understand when I tell you about the sink. Remember back to your middle school days. Do you remember the wall mount sinks?? The white porcelain ones with the 3 "spoke" handles to turn the hot and cold water on/off?? If you don't this should help refresh your memory!
Does this look familiar?! Maybe it was just the school I went to.

The absolute worst part of this sink was the fact that the water never turned off completely. The seals were ruined and it constantly ran. NOT dripped...but ran. We finally started turning the water off at the valve under the sink...every time we used it!  Very irritating!

I really wanted to take a before picture of the bathroom, but the boys were too quick with removing it. My mom and I were still out shopping for the vanity and they pulled everything out...However, I was able to find one older picture for you.
See, we made things work for us. We bought a cute little storage cabinet and put all of our bathroom essentials in there. However, when we got electric toothbrushes for Christmas we had no idea where we could charge them since there was NO counter space near the outlet. The other thing I don't miss is the fact that we always had to look at ugly plumbing pipes...Soooo here is our beautiful new bathroom counter/sink/vanity!
LOVE the granite. LOVE the drawers and cabinet. LOVE the height of the vanity. LOVE the counter space. LOVE the under mount sink!
The new vanity was the perfect height. It fit snugly under our built in soap dish and cup holder :) and look we finally have a place for our toothbrushes (we take turns charging)
There is still and ugly mirror there, but it works. We may change it out eventually, but it is a built in medicine cabinet so it is not a quick easy thing...

We also finally got around to painting Steve's office. Ceiling and walls of course because the previous owner must have decided that it was much easier to paint the ceiling the same color as the walls rather than being careful and edging or cutting in the wall color. Awesome.
Here is a before picture:
I thought I had a more recent before picture, but this is right before we moved in. Earlier, this fall I took the ugly wallpaper border down, which came off very easily thankfully. We also changed all the switch plates to white to make them look a little nicer.
If you can't quite tell in this picture, the walls were an ugly green color and incredibly DIRTY! The previous owner must have burned a lot of candles in the home...
After!

We chose a darker blue/gray because it is an office, for a boy, and Steve prefers it darker when he study's :)

Hope you like our updates...we are loving them!

Wednesday, November 9, 2011

Crafts and Christmas

I was so thankful that my mom came to visit today! As winter approaches I am seeing more and more cold weather...and less and less of my husband. Steve is becoming increasingly overwhelmed with school and his workload. I think we are both looking forward to Christmas break!
Anyway, I was so excited to have a friend to hang out with today.
We didn't do anything too exciting; just ran errands, went out for lunch and made a craft. She also helped me with some decorating and encouraged me to buy some Christmas decorations (and bought some for me :))

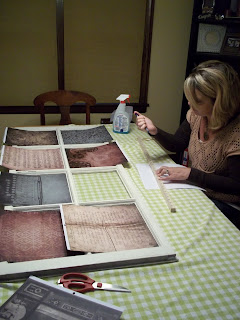
I wanted to make something with the beautiful windows we found in the garage...so we got some sweet craft paper and made wall art!

Here is our final product...we just need to get the hardware to hang it on the wall...
Hobby Lobby has 50% off all their Christmas stuff so we got two stockings, cute reindeer stocking holders and a cute/decorative Christmas tree...and since I had no fall decorations...the Christmas decorations are up!

and the dogs got to play together today...always a nice night when Hudson is all tired out :)

Thursday, November 3, 2011

Guest Room

As you know, we have been working on our guest room for a llloooonnngggg time. There really is no good excuse for why it took so long. It just wasn't fun to work on. Projects always seem fun and exciting before you start them, halfway through you are starting to get bored, but still excited for the finished project. With the guest room we got about 3/4s the way done and we were just sick of it...so there it sat.
Finally, I was bored enough yesterday that I finished painting and then when Steve got home from school at 8pm...sad :( we hung the curtain rods.

So as some of you know curtains and curtain rods are stinkin expensive! At least I think so. 50 bucks for a pole seems a little steep to me. The bargain hunter in me looked everywhere hoping to find something better....and of course I did :)
We found raw wood curtain rods and holders at hobby lobby. This was perfect because the other rods we have in our house are a dark wood, I also had just recently purchased a dark stain for another project. AND bonus...the girl at Hobby Lobby gave us 30% off!

Looking good!
Final Product:
We were quite pleased with the results and it cost about half as much!

A few pictures of Hudson...he by the way, is the STAR of puppy school. What proud parents we are :) He is such a fast learner, it is amazing to see how quickly he picks up on tricks...Here are a few we have learned so far.
Shake: 

High Five:
      Slam Dunk: (Sorry I couldn't get the angle right for self timer...deal with it.)

He also knows sit, down, crawl, and we are working on rollover and play dead or (BANG!)

Last...When Steve left for school this morning Hudson and I decided to keep snoozing. After dozing in and out for a bit I rolled over to find the dog sleeping like this....
What a gentleman! Ha...

Friday, October 28, 2011

Survivor!

I thought I would let you all know that I am a survivor! I made it through my first two night shifts. There was high anxiety, stress, and many many tears...but I did it. Go Me!!
I just need to continually remind myself to be thankful that I have a job and have been given the gift of being able to take care of these patients who need my help/assistance. I must remember to be thankful that I am not the one sitting in a hospital bed, feeling exposed in a hospital gown and in pain from surgery or a car accident.

I also wanted to throw up a few pics for you!

We finally got our new roof! Just in time for me working nights...thankfully it only overlapped one day. While I was trying to sleep they were nailing in shingles above my head...joy!
Here is an older picture and then a new picture...I think it looks significantly better :)


The garage was in desperate need of 2 things. #1 a new roof or the insurance company would not cover us and #2 a good cleaning! There was a lot of stuff left in the garage from the previous owner. A bonus to having the roof done is that we had a dumpster at our house that we were allowed to fill to the brim...so we did!
It looks so clean and organized :)
I also found 3 of these windows....treasure! Can't wait to use a fun pinterest craft on them.

Finally, a picture of our tired Hudson. He has been so good the last few days. He sleeps with Steve at night and when Steve leaves for school in the morning and I get home from work...he sleeps with me again. I can't believe he is a puppy...he has been SO good. Today, he had a few shots at the vet and apparently it made him really tired...
We were also trying to train him with his electric fence again so he becomes crippled with fear from the warning beep. Today we even taped the probes so he could not get shocked even if he crossed the boundary...he wasn't taking any chance though. He sat in one place the whole time his collar was on. ha

Enjoy your weekend! It is back to work for me tomorrow night!